Showing posts with label Papercrafts. Show all posts

Saturday, November 9, 2013

Oh Baby!!!!

Hello everyone! Thanks for stopping by.  My sister is having a baby and requested I make him a blanket. Although the picture doesn't show it very well some of the squares are silky and some are plush and soft, the rest are flannel. (and it is quite wrinkled in this picture) But I think those fabrics are very nice for a baby. His name will be Leo and he is due in early January. It will be nice to have another baby in the family.


And I did make a card to go with it. I used a Darice embossing folder for the baby clothes line, and October Afternoon printed paper. The Bazzill cardstock in the background was embossed with a folder from Provocraft is a Anna Griffin folder, and I love it. I wonder if Anna Griffin designs fabric?  I would love to see it if she does. The sentiment stamp is from The Pixie Cottage. Please contact me if you would like to purchase one. For 2.50 I will stick one in an envelope and send it out to you.
Of course I am going to enter a few challenges with my card.
Papertake Weekly -Anything Goes
Love Rubberstamps- Anything Goes
Card Mania-Anything Goes
SisterAct Challenge- Anything Goes
CAS-ual Fridays-Embossing
Interested in the Anna Griffin line of embossing folders? Presently offering 6 for $38.00 (includes US shipping)

 Hope you come by again soon!
Michelle

Tuesday, November 5, 2013

My new embossing folder!!

I had to stop by and make a quick post. I had to show you the new embossing folder I just received.  It is from Darice and called Christmas Tree and makes such elegant cards. Would you like a chance to win one? Stop by later this week for a chance.
I would like to enter this simple card in a couple of challenges.
Anything Goes at An Inky Situation
Anything goes at Sister Act
Anything goes at 4 Crafty Girlz
Anything Goes at Artistic Inspiration
Winter Wonderland at Christmas Cards All Year Round
It is Anything Goes at TTCRD
Thanks for stopping by, Michelle

Sunday, October 20, 2013

Another Tilda Card!

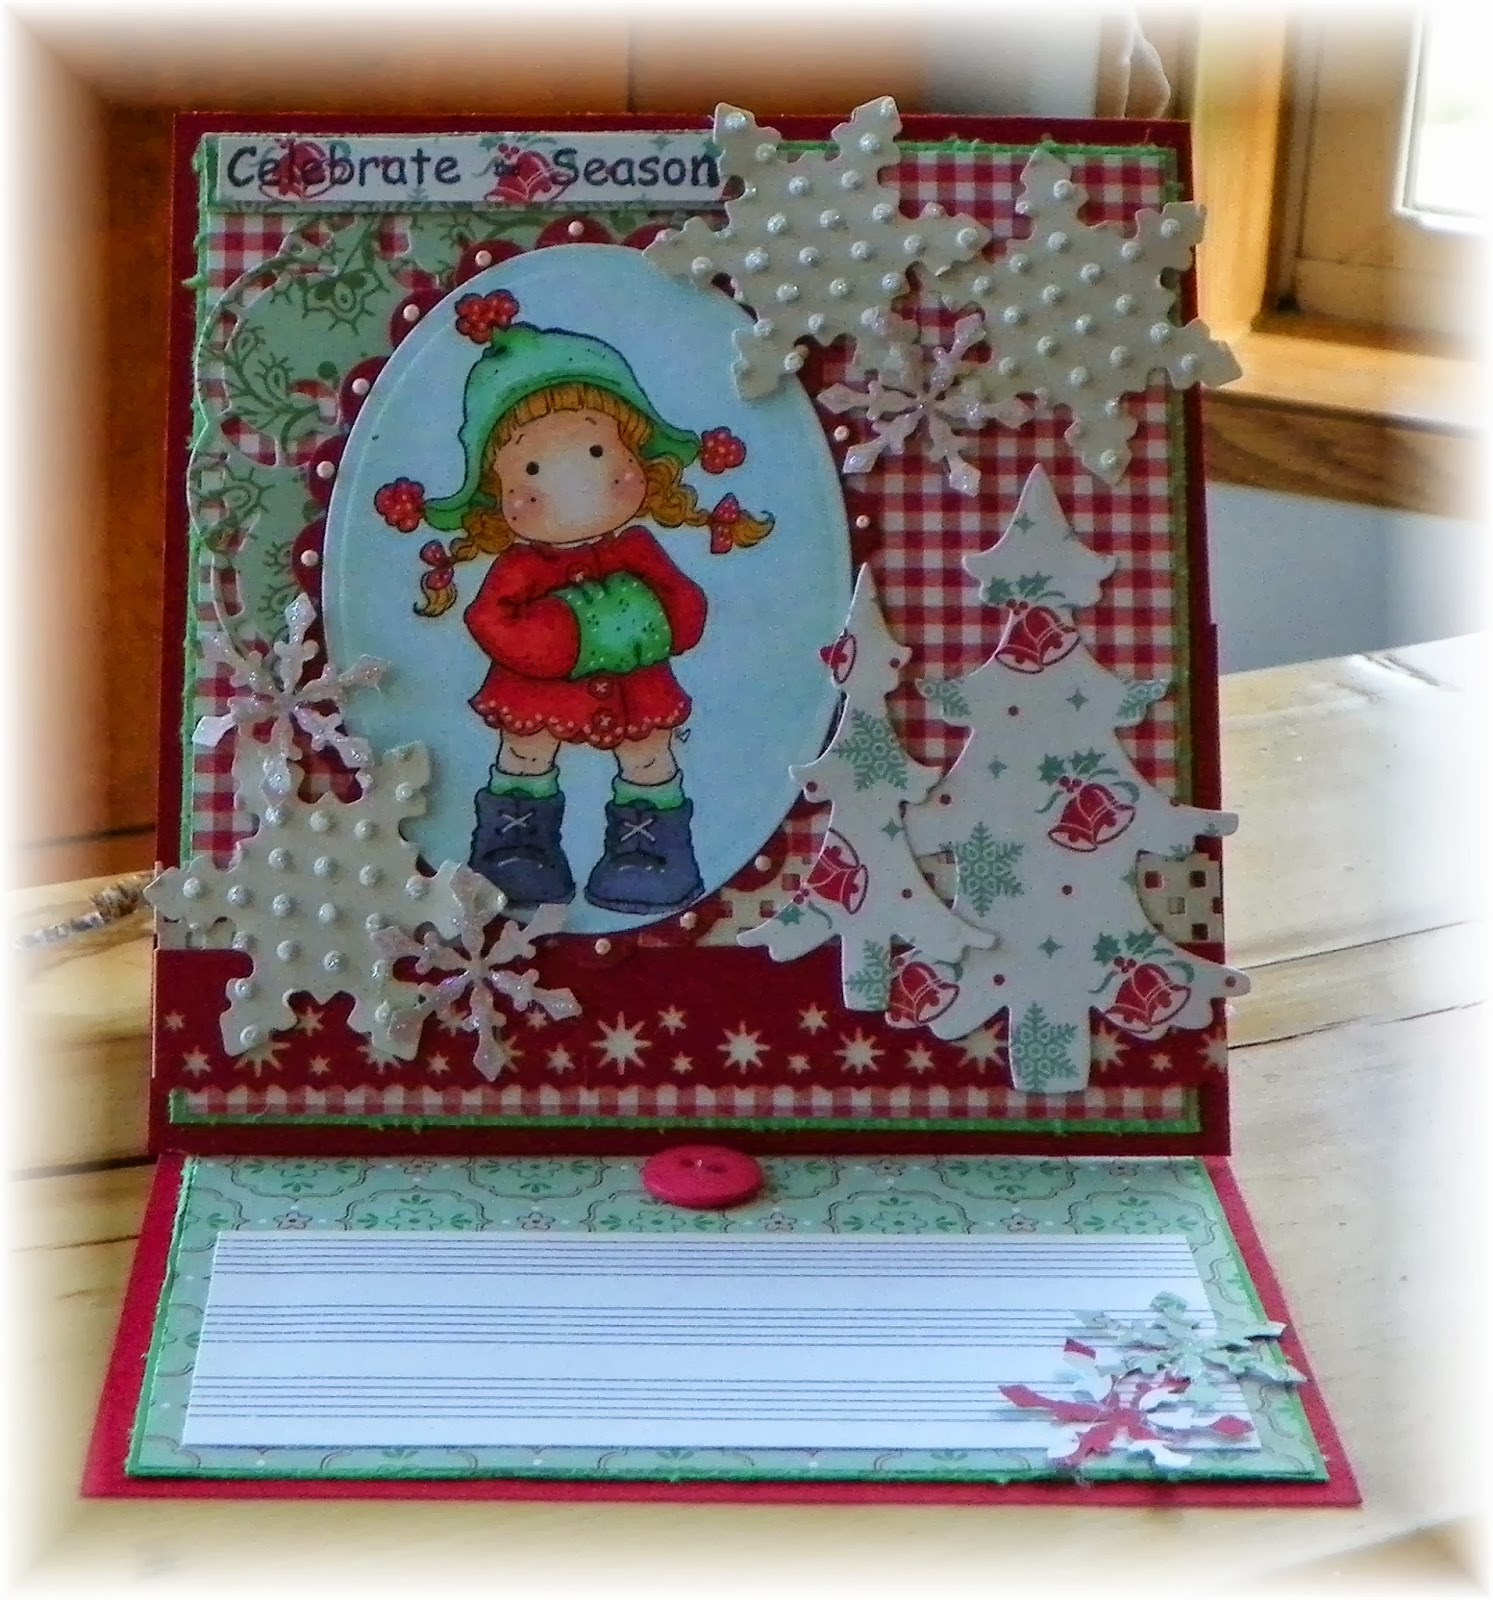
Hello crafters! I have another card with an adorable Magnolia Stamp image.

I used numerous die cuts and a Martha Stewart edge punch on this card. The large snowflake is an older sizzix die, I used liquid applieque to raise the dots that I had used an embossing folder on. I also used a Nellie Snellen Multi Frame Christmas Tree 2 die. Such a good value for the cost! The doily type die is a Marianne Design Creatable Designer Doily
I also used my Spellbinders die to frame the image and a smaller snowflake punch.

Of course I wanted to enter this card in some challenges.
Magnolia Down Under is Anything Goes
Polkadoodle Christmas is Coming
SisterAct Anything Goes
C.R.A.F.T. is Christmas
MAWTT is Christmas Cuties
Crafty Creations is Sparkle and Shine
Inky Chicks use a Fav Sentiment
Emerald Faeries want Sparkle
Paper Pretties Embellish Everything
4 Crafty Chicks is Multiple layers
----- 

The sentiment stamp is from The Pixie Cottage, and is still available for 3.50! Plus shipping to US destinations of $1.99 


------------------------------------------
I used the medium die from this set for my largest tree. There are five dies in all.
Prices include shipping 15.99 US, 18.99 Canadian/Int'l
Shipping

------------------------------------------------------

Add a winter Magnolia stamp to your collection. Snowy Tilda, Tilda with Big Bouquet or Winter Tilda (the one used in my card) for $10.99 and 1.99 US shipping. Use drop down menu to select. If you choose more than one I will adjust shipping and refund the difference.


Image

--------------------------------------------------------


Have a great week!
Michelle

Monday, October 14, 2013

I have my MOJO back!! Have a Sunny day!

Yes, that is right I have a card to share today.  For a long time I didn't have much creative energy.  I am sure that was due to several factors.  One of the big factors was the mess that my craft room had become.  If I had something that needed "put away" and I didn't have a spot, it went in the craft room.
 My craft room is still full of stuff, but I did get it cleaned up and organized over the weekend and sat down Saturday night and made this card.  It felt so good to make something pretty and girly (always my favorite kind of card)  I have a whole stack of colored images I need to put to use and I am really going to try and do more crafting.  With winter coming I should have more time.
 I am also going to try and do more decluttering. At this point I NEVER use my cricut and am thinking I should just sell it. It really is just easier to use my old sizzix die cutter.  I would like a new die cutter!! I am thinking a craftwell ebosser.  I would love to hear some feedback on that machine, since I have never had my hands on one.
Anyway back to my card. I used this cute little Tilda stamp.
Tilda with Ballet shoes. This is a Twisted Easel Card and it is really pretty easy to make. I made my card 6x6 inches.
I want to enter her in some challenges.

Nutcrafter's Show off your Coloring
Sister Act Anything Goes
Inky Impressions Glitter and Sparkle
Lady Anne's Anything Goes
Addicted to Stamp Anything Goes


  1. I cut a 6x6 card front (I decorate my card front before I attach it)
  2. Then I cut a 6x12 inch card base and scored it in the middle as you would with a traditional card.
  3. Then, I scored one side of that piece cross-wise from corner to corner to make the easel.
  4. Simply glue the card front to the easel.
  5. Hope this helps a little


I couldn't decide in which direction to situate the paper/decorations on the bottom of the card, at an angle or straight on .  I guess there is no right or wrong in crafting.
What did I use?
Bazzill cardstock
Kaisercraft printed paper
Martha Stewart punch
Prima flowers
MF Flowers
Spellbinders die
Chalk Ink
Tilda stamp colored with Copics
Ribbon
Stickles
Sentiment Stamp-Magnolia

Magnolia Tilda with Ballet Shoes can be purchased for 10.99 and 2.00 U.S shipping!! (international buyers please email me for shipping)


Saturday, October 12, 2013

Spellbinders

I have many Spellbinders in stock along with other dies!!  I will post a few of them here.
The Spellbindes D-Lites latest releases include Art Trading Card and Mirror, Mirror.
 $15.99 (Reg Price 17.99) 


-----------------------------
$11.49 (Reg  12.99)


--------------------------------------------------

Thursday, October 10, 2013

Silhouette Cameo package

I have a Silhouette Cameo package deal up for sale for those looking for a new die cutter or a great Christmas present.  You can purchase directly through my blog if you like, or if you prefer ebay that is also available there.

This is a package deal you will receive:
  • A dust cover
  •  a replacement cutting blade
  •  a spatula 
  •  additonal 10.00 gift card
  • and the Silhouette Cameo machine with USB cable; A/C adapter; instructional DVD; Silhouette Studio software; a cutting mat; and adjustable blade.
  • *************************


$289.99 plus 9.99 shipping to the lower 48 US states
It's time to get creative! This cutting tool cuts fonts installed on your computer; includes access to thousands of cuttable designs; cuts up to 12 inches wide and 10 feet long; and cuts a variety of material from vinyl to fabric.
The Silhouette Cameo is an electronic cutting tool for personal use. Like a home printer, it plugs into your PC or Mac with a simple USB cable. However, instead of printing it uses a small blade to cut paper, cardstock, vinyl, fabric and more up to 12" wide and 10 feet long. Package includes the cutting machine, Silhouette Studio software for Window XP/Vista/7 and Mac OS X 10.5.8 and higher. It also includes 51 exclusive cuttable designs, power cable, USB cable , 12" cutting mat, cutting blade, a $10 gift card to the Silhouette Online store and a basic instruction guide.

Shipping to the lower 48 US states is 9.99 for economy shipping! Please contact me for shipping elsewhere or priority US shipping!
Have a great evening, Michelle

Wednesday, October 9, 2013

Lots of new items in stock!

Stop by my ebay store and check out some of the fat quarters, edge punches and dies I have listed for sale.


Michelle

Monday, August 12, 2013

New Spellbinders!!!

New Spellbinders coming soon....very soon!!! Email me to put in your preorder at 25% off retail prices.  Here are pics of just a few. If you would like to look at them all let me know and I will add you to my newsletter list and email them to you.
Contact me by August 17th to put in your preorder, they are expected to arrive at the end of the month and will ship out as soon as they arrive.  Payment is expected via paypal when order is placed. I will send you an invoice through paypal.  Have a great week!
Michelle


Thursday, August 1, 2013

Copic Markers Storage, Color Selection and Tips


Which Ones are Starter Markers, How do you store them? What do those numbers and letters mean

Where do you store the markers? That seems to be a popular topic. I kept my markers in a Lazy Susan type device that sits on top of my craft table until recently when I actually bought a retail display unit, but there are so many alternatives to storing these markers I could write a page just about storage. I recommend browsing the blogs and paper crafting sites for ideas.


I have a lot of people ask me which colors they should start with, and I really think this depends on what you are going to color. I myself usually use stamps that are images of people, so I needed skin colors, hair colors and basic clothes colors first.

If you want to take this to a higher level you will want to purchase more than one shade of the same color so that you can shade and highlight your images. So how do you know which colors will do that? Buy three markers in the same color family. What is a color family you ask? The color families are indicated by the letter on the marker. For instance, B is for blue, BV is blue violet, E is Earth, R is reds, V is violets, G is greens, RV is red violet, Y is yellow, YG is yellow green, YR is yellow red, BG is blue green, N is neutral or natural grays, W is warm grays, T is toner grays, and C is cool grays. There are also Black and Special Black, a Colorless blend and Fluorescent colors.

So that brings up another question. What do the numbers on the markers mean? The first number is the saturation of the color, the higher the number the more gray in the color, thus it will not be as vibrant as a lower number will be. The second number is the brightness. The lower numbers are light and higher numbers are darker.

As a general rule, when you are trying to pick 2 or three colors to use for blending keep the above information in mind. Pick 2 or three markers with the same letter. Also keep the first number the same ( for instance all markers in the B20’s) Now you want to look at the second number and pick two or three markers that are a couple numbers apart. For instance, B21, B24 and B27.

The lowest number will be used for highlighting, and the highest number is for shading.

I personally have also found you can use two different colors and successfully blend them. Just make sure that the two different colors are close to the same color family (you can check a color wheel if you have one, but visually it is easy to see this yourself) Also make sure the numbers are not too far off from each other.

You will find with Copics that these rules are general rules, and there are some markers that do not follow these rules. Why… I am not sure. As this is what Copic teaches, but there are colors that JUST DON’T blend well that according to “the rules” should blend well. (You know rules are made to be broken)


Questions About Coloring

What ink should you use? Can you color digital images? What kind of paper should you use? What about that blender? There are so many questions to consider. I personally use Memento Tuxedo Black Ink. You do not have to heat set this ink. I stamp my image and let it sit for five or ten minutes and color it. No smearing. I also find with my Epson printer if I print a digital stamp and let the paper sit for a couple of hours there is no smearing. I recently purchase a new Kodak printer and have not had any troubles with smearing with it either. But I have heard different printer’s ink do smear and need to be heat set. So I say make a trial run and see what happens.

I have used several types of paper for stamping and coloring with Copics. Let me say first you will need at least an 80 pound cardstock. The finish of the paper will determine how much time you have to blend your colors. Different papers require a little different technique. I personally use Georgia Pacific that I purchase at Walmart *gasp! That is my standby, cheap paper. For special projects, or items I really want to play around with in blending, I use Neenah Solar Classic Crest White Super Smooth Smooth Cardstock. (#80 does the trick for me. I am sure you will have other people with other opinions, but I say try the least expensive alternative first, and if you aren’t happy with the results work your way up in price.)

What about the Colorless Blender? Well, it is NOT a blender. It takes the color off the paper when you use it. So I found it was especially useful for removing ink when I color “outside the lines”. I have also “heard” that is good for special techniques. I honestly haven’t tried any of that yet, but will let you know when I do.

Do I Need to Take A Class? Are these markers only for “Artists”
Many crafters opt to take classes teaching them how to use Copics. Does it help? I would think so. Is it necessary? I would say no. I think if you use the general principles provided in this short article that trial and error is the best teacher you can have. You don’t need to be a professional artist to use these, there is nothing to tricky or difficult about them. Remember the old saying? Practice Makes Perfect.

(well maybe never perfect, but good)

Where do I start?

I personally love to color people images so I started with skin tones, and pinks and continued to use colored pencils to fill in as I slowly built my collection.

Good starter skin tones for Caucasians: 

E00, E000, E02,E11

I do put custom orders together for my customers, and would be glad to do so for you just let me know.

And last of all, enjoy those Copics! Crafting is suppose to be fun and relaxing, so don’t sweat the small stuff!


Wednesday, July 31, 2013

Copics--the difference between Ciaos and Sketches

COPIC MARKERS INFORMATION
Post on Copic Storage CLICK HERE

As a beginner Copic user I know I had many questions. As a seller of Copic markers, I also receive a lot of questions from people interested in investing in these markers. I have written this short summary to help everyone out.

The Difference Between the Copic Sketch and Copic Ciao Markers
The main questions seem to focus on Sketch versus the Ciao markers that Copic makes, so I will start there. Let me commend Copic for making a “Green” marker. These markers will last a lifetime. You simply buy the refills and replaceable nibs for the markers if needed, and use them over and over. So you will never have to through away another old dried out marker.
Lets talk about the differences between the Sketch and Ciao markers now. Copic Sketch and Copic Ciao have a different shaped barrels. The Sketch has an oval type barrel and the Ciao has a round barrel. Proponents of the Sketch marker say it doesn’t roll off the table. It rolls, trust me, just not easily as its counterpart, the Ciao. Both markers have two ends to color with. One end is a brush nib, and great for detailed areas, the other is a wider nib for coloring larger areas. The nibs are replaceable on both types of markers, and both types can be refilled when they run out of ink.

Another difference worth mentioning is the Sketch markers are compatible with the Copic Airbrush system, and the Ciao are not. (Unless you are a handy person who likes rigging things up… I have heard it is possible to rig up the Ciao marker to the airbrush system)

I have also heard people say they like the fact that the Sketch markers have the numbers marked on the caps at the end of the markers. The Ciaos have the numbers listed on the side of the barrel. Depending on how you store them having the numbers on the caps may be very handy and quick when looking for colors to shade and blend with. (So you must weigh handy versus cheaper… and everyone has their own preference there)
When it came down to deciding which type I wanted to buy to use in my paper crafting it simply came down to money. They Ciaos are a bit cheaper. I have found out having 70 or so markers is adequate, although I want more!

Thursday, July 25, 2013

All About Ink

Dye Ink

Dye ink is water-based. They are comparatively fast drying and meant to be used on surfaces that are porous like paper. These inks are water soluble and will run if mixed with water. It will inks wash off with water and a little soap, pretty easy to keep your stamps clean when using this type of ink.


Solvent Inks

Solvent inks are permanent inks that can be used to stamp on non porous surfaces such as glass and metal.

Pigment Inks

Pigment inks are usually richer in color and they take longer to dry. They are fade-resistant, and are good to use for embossing techniques


My choice of inks to use with copics is Memento.


If you have any questions please feel free to email me at  casdanben@aol.com.

Wednesday, October 31, 2012

Nativity CollectionMagnolia Rubber Stamps
Available Now for Order:
Each stamp is 11.99, plus shipping.

Which Stamp

Which Stamp

Which Stamp


Nativity Release

Allow up to 2 weeks for shipping.
Thanks, Michelle

Friday, May 25, 2012

A little card to share

I just wanted to make a quick post and show you the card I made for my mom for Mother's Day.  I wish I had time to enter some challenges, but busy busy this weekend.
I love the little girls that Mo Manning draws!  This is one of her images, I colored it with Copics in grays.  I believe they were the "C" cool grays.  I also used some paper from Melissa Frances, liquid pearls, Prima flowers, a Martha Stewart punch and Bazzill cardstock.  I am sure I missed something.. if you have any questions please just leave a comment!
Have a wonderful weekend.
Michelle

Monday, October 17, 2011

Basic Grey Sale!

Basic Grey 6x6 Paper Pads
All BG pads are marked down by 50% today and tomorrow only!!

3.00 each while supplies last


In fact almost all things Basic Grey are marked down!

If you would like to purchase online and pick up in store I will refund your postage, just let me know.


So stop by and check out the Basic Grey!  Michelle


Monday, July 11, 2011

Embossing Folders Clearance Priced

Making way for more new inventory being released later this month. I have marked down embossing folders listed below. Sale good while supply lasts. Most items marked down more than 25%!

Sizzix Embossing Folders (includes Tim Holtz)


Basic Grey paper selling for 9.99 a pack almost gone! More items to come later this week


Michelle

Wednesday, June 29, 2011

Some New Goodies!

Just had to stop by and show you some of the new things that have arrived!!
New Embossing Folder from Sizzix

Bo Bunny's Adorable Zoology Paper pad

and new Kaisercraft


Pick your poison!
Michelle